Preparing artwork correctly is one of the most important steps before starting Embroidery Digitizing. A good design file gives the digitizer clear information about shapes, colors, outlines, and details. When artwork is poorly prepared, the final embroidery can look uneven, unclear, or different from the original design.Whether you are preparing a company logo, sports emblem, fashion graphic, patch, cap design, or custom illustration, the quality of the original artwork matters.
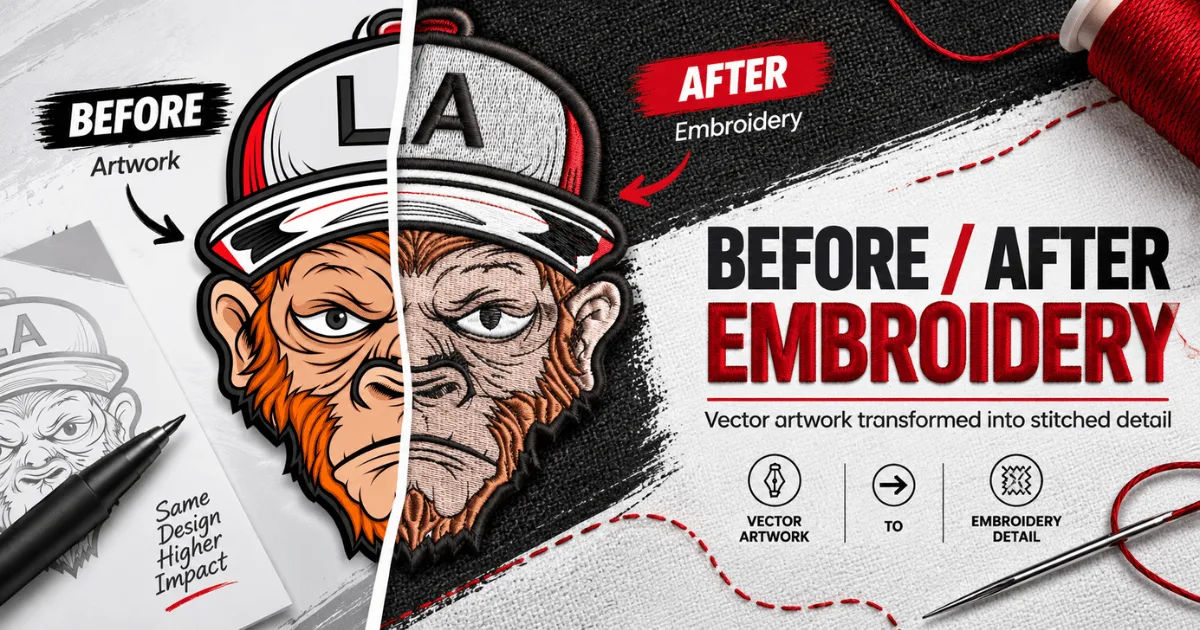
However, preparing artwork for embroidery is different from preparing an image for printing. Embroidery uses stitches instead of ink, so some visual details need to be simplified or adjusted.This comprehensive guide explains how to prepare artwork for Embroidery Digitizing, which file formats work best, what details should be removed or improved, and how to make sure the final stitched design looks professional.
Artwork Preparation for Embroidery
Artwork preparation means making a design suitable for conversion into an embroidery file. The original artwork may contain gradients, shadows, tiny text, complex textures, or other effects that work well on a screen but cannot always be reproduced accurately with thread.
During Embroidery Digitizing, the artwork is converted into a series of stitches. The digitizer decides where stitches should begin and end, how different sections should overlap, and which stitch types should be used.
Therefore, the artwork should provide a clear visual reference.
A clean design does not necessarily mean that the artwork must be extremely simple. Detailed artwork can also be digitized, but the details need to be suitable for the intended embroidery size.
Start With High-Quality Artwork
The first rule is to provide the highest-quality artwork available.
Low-resolution images can make important design elements difficult to identify. A small, blurry image may contain unclear edges, distorted text, or missing details.
If possible, provide the original vector artwork rather than a screenshot or compressed image.
Why Resolution Matters
A high-resolution image allows the digitizer to see the exact boundaries of each element. This becomes especially important when a logo contains small shapes or lettering.
For raster artwork, formats such as PNG, TIFF, or high-resolution JPG can be useful. However, a vector file is generally preferable because it can be resized without losing sharpness.
Avoid Screenshots When Possible
Screenshots are often compressed and may contain unwanted backgrounds, interface elements, or incorrect colors.
Instead, send the original artwork exported from the design software. This gives the digitizer a cleaner reference and reduces the possibility of mistakes.
Use Vector Artwork Whenever Possible
Vector files are often the best starting point for Embroidery Digitizing.
Common vector formats include:
- AI
- EPS
- SVG
- PDF with vector elements
- CDR
Vector artwork consists of mathematical paths rather than fixed pixels. This means the design can be enlarged or reduced while maintaining clean edges.
A digitizer can also identify individual shapes more easily when they are separated into editable vector elements.
Keep Shapes Clearly Defined
Each major part of the design should have a clear boundary.
For example, if a logo contains a circle, letter, and decorative symbol, those elements should be visually distinct. Overlapping objects should also be arranged logically.
This helps the digitizer understand which areas should be filled and which should remain open.
Clean Up the Artwork Before Submission
Artwork should be cleaned before it is sent for digitizing.
Remove unnecessary objects, hidden layers, duplicate shapes, and stray points. These elements may not be visible in the final design but can make the artwork more difficult to interpret.
Check the design carefully at high magnification.
Look for:
- Unwanted lines
- Extra points
- Duplicate objects
- Broken outlines
- Unnecessary background elements
- Overlapping shapes
- Incorrect letters
- Uneven curves
A clean file saves time and helps create a more accurate embroidery result.
Simplify Extremely Small Details
One of the biggest differences between digital artwork and embroidery is the way small details behave.
A thin line that looks perfect on a computer screen may be too narrow for thread. Tiny gaps can also disappear after stitching.
For this reason, artwork may need to be simplified before Embroidery Digitizing begins.
Remove Details That Cannot Stitch Clearly
Tiny decorative elements should be reviewed carefully.
If a design includes many small dots, thin lines, narrow spaces, or miniature symbols, consider whether they are essential.
Removing a few minor details can sometimes make the finished embroidery much easier to recognize.
Preserve the Main Visual Features
Simplification does not mean removing everything.
The goal is to preserve the features that make the design recognizable while eliminating details that are unlikely to reproduce well in thread.
A professional digitizer can often recommend which elements should be adjusted.
Make Text Easy to Read
Text requires special attention.
Small lettering is one of the most challenging parts of embroidery because individual stitches require enough space to form recognizable characters.
Before submitting artwork, check:
- Font style
- Letter height
- Letter spacing
- Stroke thickness
- Word spacing
- Text alignment
Avoid extremely thin fonts when the text will be embroidered at a small size.
Consider the Final Embroidery Size
Text that looks readable on a large logo may become difficult to read when reduced.
For example, a company name might look excellent on a jacket back but become unclear when placed on a small shirt chest area.
The digitizer should know the intended size so the lettering can be adjusted appropriately.
Use Solid Colors When Appropriate
Embroidery thread creates a different visual effect from printed ink.
Artwork containing solid color areas is generally easier to interpret than artwork filled with complicated gradients.
When preparing artwork, identify the main thread colors clearly.
A design with five visual colors does not always require exactly five thread colors, but clear color information gives the digitizer a useful starting point.
Avoid Unnecessary Gradients
Gradients can be difficult to reproduce directly with embroidery.
A printed gradient can smoothly transition from one color to another. Embroidery usually needs separate thread colors and stitch arrangements to create a similar visual effect.
Depending on the design, a gradient may be replaced with:
- A solid color
- Two or more thread colors
- A patterned fill
- A shading effect created through stitch density
The appropriate solution depends on the artwork and its final size.
Clearly Identify Important Colors
If the artwork uses specific brand colors, provide accurate color references whenever possible.
You can provide:
- Pantone references
- Brand color specifications
- RGB values
- CMYK values
- Hex codes
- Existing thread references
Thread colors may not perfectly match colors displayed on a monitor. Providing a reference helps the digitizer select a closer thread.
Remove Unnecessary Backgrounds
If you are digitizing a logo, the background should normally be separated from the main design unless the background itself needs to be embroidered.
For example, a logo placed on a white background does not automatically mean that a large white embroidered area is required.
Backgrounds should be included only when they are part of the intended embroidery.
This is particularly important for designs that will be placed on different garment colors.
Check Outlines and Borders
Outlines can make embroidered designs easier to recognize, but they must be suitable for stitching.
A very thin outline may disappear. An excessively thick outline can cover nearby details.
When preparing artwork, make sure outlines are clearly visible and consistent.
Understand the Role of Underlay
Underlay is not normally something that needs to be drawn into the artwork. It is a stitching foundation created during Embroidery Digitizing.
The digitizer chooses the appropriate underlay based on the fabric, stitch type, shape, and design.
A clean artwork file allows the digitizer to focus on these technical decisions rather than trying to interpret unnecessary visual instructions.
Consider the Fabric
Artwork preparation should also consider where the design will be embroidered.
Different materials behave differently.
For example, a design intended for:
- Cotton shirts
- Denim jackets
- Caps
- Fleece
- Polo shirts
- Towels
- Performance fabrics
- Heavy workwear
may require different digitizing approaches.
The same artwork may therefore need adjustments depending on its application.
Why Fabric Information Matters
Fabric can affect stitch appearance, registration, density, and detail.
A design that works well on a stable woven material may require different treatment on stretchy fabric.
When submitting artwork, provide information about the garment or material whenever possible.
Specify the Intended Size
Never assume that the artwork's digital dimensions represent its final embroidery size.
Tell the digitizer the intended width and height.
For example, you might specify that a chest logo should be approximately 3.5 inches wide or that a jacket-back design should be significantly larger.
Size directly affects stitch density and detail.
Create Artwork With Scale in Mind
Before Embroidery Digitizing, consider how the design will look at its actual embroidered size.
If a design contains tiny elements, shrink it to the intended size on screen. This can reveal which details may become difficult to reproduce.
A practical review at the final size is often more useful than examining the artwork at a very large scale.
Prepare Separate Versions When Necessary
Some designs need multiple versions.
A detailed logo may be suitable for a large jacket-back application but not for a small cap.
In that situation, creating a simplified version for smaller applications can produce better results.
This approach is especially useful for businesses that use the same branding across different garments and promotional products.
Large and Small Versions
A large version can retain more detail.
A small version may use:
- Larger lettering
- Fewer decorative elements
- Thicker lines
- Simplified shapes
- Reduced color complexity
This is not a change to the brand identity. It is an adaptation for a different production method and size.
Choose the Right File Format
Providing the right file format makes the digitizer's work easier.
Preferred formats can include:
Vector: AI, EPS, SVG, and suitable PDF files.
Raster: PNG, TIFF, and high-resolution JPG files.
If you have the original editable design file, provide it whenever possible.
Do not confuse artwork formats with embroidery machine formats. Files such as DST, PES, EXP, JEF, and VP3 are embroidery formats generated after digitizing.
The artwork is the visual source; the embroidery file contains stitching instructions.
Provide Clear Production Instructions
Artwork alone may not provide all the information needed.
Along with the design, provide practical instructions such as:
- Final embroidery size
- Garment type
- Placement
- Desired thread colors
- Number of items
- Preferred embroidery format
- Special requirements
- Deadline, if relevant
Clear instructions reduce unnecessary back-and-forth.
Review the Artwork Before Digitizing
Before sending the file, perform a final inspection.
Ask yourself:
- Is the artwork sharp and clear?
- Are all words spelled correctly?
- Are unwanted backgrounds removed?
- Are colors clearly identified?
- Are tiny details necessary?
- Are outlines visible?
- Is the intended size specified?
- Is the target garment identified?
- Is the correct original file being provided?
- Are there any hidden or duplicate objects?
A few minutes of preparation can prevent significant problems later.
Communicate With the Digitizer
Good communication is an important part of successful Embroidery Digitizing.
Do not hesitate to explain what parts of the design are most important.
For example, if a particular symbol must remain highly visible, mention it. If a small tagline can be removed to improve readability, communicate that as well.
The digitizer can then make technical decisions while keeping the original purpose of the design in mind.
Ask for a Digitized Sample
For important projects, requesting a sample or sew-out can be extremely helpful.
A digital preview may show how the stitches are arranged, but a physical sew-out provides a better understanding of how the design actually behaves with thread and fabric.
A sew-out can reveal:
- Poor registration
- Weak outlines
- Small unreadable text
- Excessive density
- Unwanted gaps
- Fabric distortion
- Color issues
Corrections can then be made before producing a large quantity.
Common Artwork Preparation Mistakes
Several mistakes can make the digitizing process harder.
Using Low-Resolution Images
Blurry artwork makes shapes and text difficult to identify.
Sending Only a Screenshot
A screenshot may not contain the original design information.
Keeping Too Many Tiny Details
Small details can disappear in embroidery.
Ignoring Final Size
Artwork should be reviewed according to its actual intended dimensions.
Using Very Thin Fonts
Fine lettering can become difficult to stitch and read.
Forgetting Fabric Information
The material can influence how the digitized design should be constructed.
Assuming Screen Colors Equal Thread Colors
Monitor colors and embroidery threads do not always match exactly.
Treating Printing Artwork as Finished Embroidery Artwork
A design optimized for digital or printed media may need technical changes before stitching.
How Professional Artwork Improves Embroidery
Well-prepared artwork gives the digitizer a strong foundation.
Instead of spending time identifying unclear shapes or reconstructing missing information, the digitizer can concentrate on stitch direction, density, sequencing, underlay, pull compensation, and other technical factors.
This can improve both efficiency and final quality.
Good preparation also makes it easier to maintain consistency across multiple garments.
Final Checklist for Artwork Preparation
Before submitting artwork for Embroidery Digitizing, use this checklist:
- Provide the highest-quality original artwork.
- Use vector artwork when available.
- Remove unnecessary backgrounds.
- Clean up unwanted lines and objects.
- Check spelling carefully.
- Identify important colors.
- Simplify unsuitable tiny details.
- Review small text carefully.
- Specify the final embroidery dimensions.
- Mention the target fabric.
- Explain the intended placement.
- Provide special production instructions.
- Request a sample for important projects.
- Keep the original editable file safely stored.
Conclusion
Preparing artwork correctly is a crucial part of achieving professional embroidery. The better the artwork is organized and presented, the easier it becomes to convert the design into accurate stitching.
The most important goal is not simply to make the artwork look attractive on a computer screen. It must also provide a practical foundation for thread-based production. Thin lines, tiny lettering, gradients, complicated textures, and unnecessary details may need to be simplified.
High-quality vector artwork is usually an excellent starting point. However, even vector artwork should be reviewed for size, readability, color, and production requirements.
Clear communication is equally important. Providing the intended dimensions, garment type, placement, colors, and other instructions gives the digitizer the information needed to make informed technical decisions.
Remember that Embroidery Digitizing is a process of translating visual artwork into stitches. Not every element that works in print will work in thread exactly the same way. A skilled digitizer can adapt the design while preserving its most important visual characteristics.
By cleaning your artwork, simplifying unsuitable details, checking text, identifying colors, considering the fabric, and reviewing a sample when necessary, you can greatly improve the chances of getting a clean and professional embroidered result.